Vui lòng liên hệ với chúng tôi– chúng tôi sẽ liên hệ lại với khách hàng bằng điện thoại hoặc email.
Lưu ý: Tham khảo ý kiến của nhân viên INO sẽ giúp bạn tiết kiệm được thời gian và chi phí khi cần mua sắm. Với sự tư vấn của chúng tôi, bạn sẽ không gặp khó khăn khi tìm hiểu về đặc tính của sản phẩm cần mua.
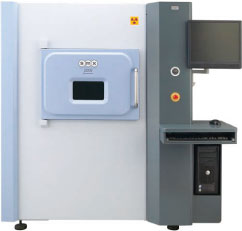
SMX-2000 is an X-ray Fluoroscopic inspection system for observing and inspecting internal structures and mounting conditions in electronic devices. The operation system, with its fast-moving stage and rapid inspections, works seamlessly with the newly developed mouse-operated control software "XEVOLUTION" to provide a fast observation. A teaching function that boosts repeatable inspection efficiency enhances flexibility and enables easy development of flexible inspections. Furthermore, combining a high-output, high-resolution new-model X ray system with a high-resolution flat panel detector produces distortion-free, reliable images.
Fast Manipulation
Fast movement to the inspection piont
Flexible Inspections
Flexibly designed inspections
Clear Images
Distortion-free, reliable images
Specifications
| Spatial resolution | 1µm(resoloves Line and Space Chart) |
|---|---|
| Maximum mountable size/sample weight | W470 x D420mm, 5kg |
| Maximum inspection area | X:460 mm, Y:410mm |
| X-ray output | Max.tube voltage 160kV/Max. tube current 200µA |
| Detector | Flat panel detector, Rotation:±180°, Tilt:+0-70° |
| System magnification | 8,700 times |
Fast movement to the inspection point
A few mouse clicks are all that is needed to move from sample setup to display of the desired image. The fast-positioning drive system not only provides faster access, it also combines view rotation and tilt operation with a tracking function for quick and easy inspection of the desired point from any angle.

Presets

Use the preset function to easily register monitoring positions and conditions in advance. Just click on a registered number to reproduce the pre-set inspection conditions.
Mouse Click for Stage Manipulation
Move the stage with just a simple mouse click, even when monitoring peripheral locations.
Live Movement

Click the mouse directly on the fluoroscopic image to intuitively move the stage and the flat panel detector. Never having to look away from the monitor lets you concentrate on inspection.

Flexibly designed inspections
XEVOLUTION builds on Shimadzu's previously developed teaching and step feed functions that improve efficiency and make possible highly reliable inspections with minimal dependence on the operator. Image measurement, data saving and print setting selection can all be performed for each inspection point, resulting in a flexible inspection environment design that responds to various different inspection specifications. Operators are supported by a full range of functions, including easy monitoring of inspection conditions during inspections, reference image displays for judgments and repeating or skipping scans.
Teaching Function
Registering inspection points in advance allows you to efficiently perform repeated inspections of the same sample. At each point you can register not only stage positioning data, but also X-ray conditions and various image measurement functions, allowing advancedlevel, semi-automatic operation.

Step Feed Function
Convenient for inspecting parts on a pallet and samples positioned in latticed arrays, this function lets you easily register step movement intervals and directions. You can also register X-ray conditions and a variety of image measurement functions for each point.

Applications for Teaching Function/Step Feed Function
Not limited to only measurement items, settings can also include image saving conditions, print conditions, and countermeasures for when defects are detected.

Measurement Functions
Standard equipment includes BGA measurement, area ratio measurement, dimension measurement, object measurement (area, perimeter length, roundness, etc.), wire sweep ratio measurement, and histogram measurement. You can save the measurement results in a CSV file. Since XEVOLUTION is constantly monitoring the sample position information, you can output accurate dimension values and area values without the need to perform calibration operations. You can execute these measurement functions through manual manipulation of the captured image, and also through auto manipulation incorporated in the step feed function and teaching function.
BGA Measurement

Measure the void area and area ratio of solder balls in the designated ROI (region of inspection).
Area Ratio Measurement

Measure the object area ratio (object area/ROI area) in the designated ROI (region of inspection).
Dimension Measurement

Click on two or three designated points to calculate the distance, curvature radius and angle.
To designate a position, use the partial enlargement function for accurate selection.
To designate a position, use the partial enlargement function for accurate selection.
Object Measurement

This function measures the part features of an extracted object. It has six measurement items, including area, perimeter length, roundness, diameter (average), diameter (minimum), and diameter (maximum).
Wire Sweep Ratio Measurement

Click on the wire ends and the maximum curve point to calculate the wire flow rate. To designate the wire end, use the partial enlargement function for accurate selection.
Lưu ý: Nếu một thiết bị nào đó không được liệt kê ở đây, điều đó không có nghĩa rằng chúng tôi không hỗ trợ được bạn về thiết bị đó. Hãy liên hệ với chúng tôi để biết danh sách đầy đủ về thiết bị mà chúng tôi có thể hỗ trợ và cung cấp.
INO: Bán, Báo giá, tư vấn mua sắm và cung cấp, tư vấn sản phẩm thay thế; tương đương, hướng dẫn sử dụng, giá…VNĐ, …USD info@ino.com.vn | INO Sales: 028 73000184 | Shimadzu- Microfocus X-Ray Fluoroscopy System (Model:SMX-2000).


